
Click on the Settings tab in the main toolbar at the top of the IPShare page. Under Personal Settings, fill in the current password and new password fields to reset your password.
Navigate to the Settings page in the main toolbar at the top of IPShare page. Scroll down on this page to view Organisation Settings. To change the company logo, upload an image file, recommended dimensions: 300 x 100 px, max size: 500KB and select the green “Change logo” button below to save it.
There is no limit to the number of projects any users can be a member of.
Up to 10,000 documents can be added to a single project.
You do not need to have PatBase to use IPShare, however they are compatible and can be used in conjunction with each other to search and share patent information.
Navigate to the Projects page using the main toolbar at the top of IPShare. In the row of the project you want to change the notification interval for, select the blue Edit button with the blue cog icons.
This will open a pop-up window where you can set the Notification Interval for the selected project using the drop-down options menu. This will only affect your notification frequency for that project.
To change the notification frequency for another user, navigate to Permissions within a project.
Within a project, there is a blue button above the documents table that is labelled “Import Patents”.

Click this button and a pop-up window will appear where you can type or paste in multiple patent numbers. Patent numbers must be separated by comas or one on each line.
There is an option to bulk apply existing labels to all imported documents. Select the blue “Apply labels to all imported patents” button in the lower left corner, and a list of your existing labels will appear. You can select multiple labels to apply at once.
To start the bulk patent document upload from PatBase’s database, click the blue Import button in the lower right corner.
Deleting a user does not erase their work. All documents, chat entries, annotations etc. they may have created will stay on the account.
An existing Highlight Set/Labels needs to be applied on a project.
Open the project you wish to add the same highlighting/label set to. Select the highlight/label icon option in the projects toolbar above the documents table. Select “Import Highlight Set”/”Import Labels” and a pop-up window will appear prompting you to select the project to import the highlight set/label from.
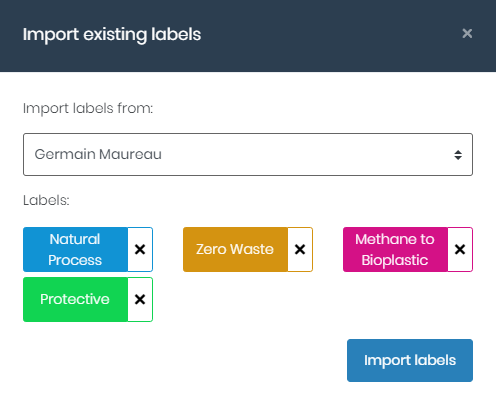
Once you have selected the project, the existing highlight set/labels will appear. For label imports only, you can remove individual labels from the import by clicking “x” to delete.
When you are ready select “Import Highlight Set”/”Import Label”.
Start by opening the document by clicking the publication number in the project table. Left click and hold your mouse to highlight text of interest. This will automatically trigger a blue “Add Annotation” button to appear next to your text on the right. Click this button to attach a note to the selected text. To save your note, simply click the green save button under the text box, and to discard it, press the red cancel button.
There are two ways to export a project, either you can export the full project including all the information or you can export a summary of the project.
First, open the Projects page using the blue toolbar at the top of the page. Then open the project you want to export by clicking the title of the project in the table. Navigate to the project toolbar in the top right of the page, and select the type of export you would like to start.
An Export Summary will export an Excel document with summary data of the documents in your project. This Excel sheet includes a table with the family number, patent number, title, abstract, claims, labels, annotations, rankings and more, for each document in your project.
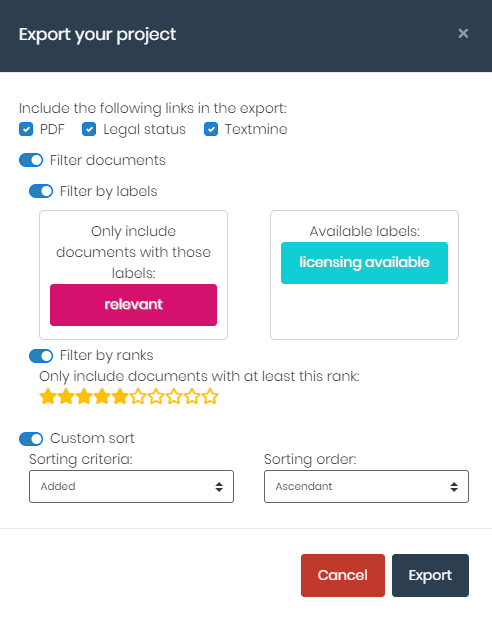
When you select Export Project, before your Excel export begins, you have the option to include the link to full text pdf, legal status or Textmine for each publication in your export. You can also pre-filter documents by labels or rankings. When you have made your selections, click the black ‘Export’ button to begin the download.
The Excel document exported will appear in your browser’s download area upon completion.
When you open the project export, the first page shows you a full contents list including the publication number, title and date added to the project on IP-Share. The titles are links to corresponding tabs in the Excel file, so clicking on the title takes you directly to the tab containing rankings, labels, bibliographic information and claims of the publication.